
XML DI에서 Annotaion DI로 변경하는 과정을 알아보자
우선 아래의 `<property name="exam" ref="exam" />` 부분을 InlineExamConsole 클래스의 setter 메서드 위에 @Autowired를 달아주면 대체할 수 있다.
<bean id="exam" class="spring.di.entity.NewlecExam" p:kor="10" p:eng="10" p:com="10" p:math="10"/>

// ExamConsole console = new GridExamConsole();
<bean id="console" class="spring.di.ui.InlineExamConsole" >
    // console.setExam(exam);
    <property name="exam" ref="exam" />
</bean>
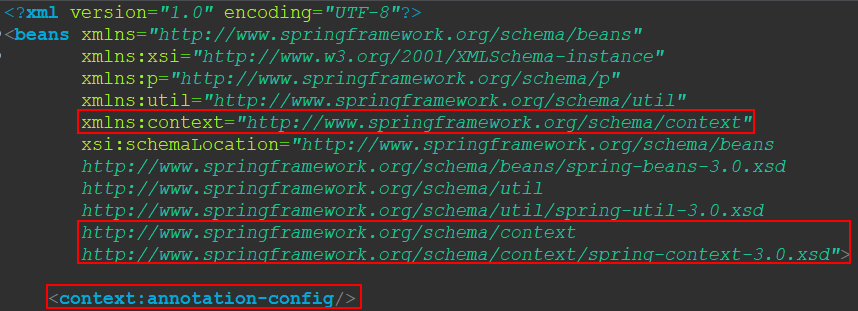
그러기 위해선 사전 작업으로 아래의 내용을 xml 파일에 추가해주자
이제 아래의 setter메서드에 @Autowired를 달아주면 정상 실행된다.
//InlineExamConsole 클래스

@Autowired
@Override
public void setExam(Exam exam) {
    this.exam = exam;
}
그런데 무엇을 근거로 @Autowired는 InlineExamConsole에 exam을 결합 시켜주는것일까? 이전에는 ref를 통해 명시해주었지만 `<property name="exam" ref="exam" />`가 사라졌으니 @Autowired가 달린 setExam 메서드 존재하는 정보를 가지고 결합시켜주어야한다.
<context:annotation-config/>

<bean id="exam" class="spring.di.entity.NewlecExam" p:kor="10" p:eng="10" p:com="10" p:math="10"/>
<bean id="console" class="spring.di.ui.InlineExamConsole" >
    // <property name="exam" ref="exam" />
</bean>
정답은 기본적으로 public void setExam(Exam exam){ ... }의 Exam과 같은 자료형으로 참조할 수 있는 클래스를 찾아서 바인딩해준다.
즉, id="exam"에서 id="exam1"로 변경해도 혹은 아예 삭제를 해도 정상 실행된다.
<context:annotation-config/>
// id="exam"에서 id="exam1"로 변경
<bean id="exam1" class="spring.di.entity.NewlecExam" p:kor="10" p:eng="10" p:com="10" p:math="10"/>
<bean id="console" class="spring.di.ui.InlineExamConsole" >
    // <property name="exam" ref="exam" />
</bean><context:annotation-config/>
// id="exam"를 삭제
<bean class="spring.di.entity.NewlecExam" p:kor="10" p:eng="10" p:com="10" p:math="10"/>
<bean id="console" class="spring.di.ui.InlineExamConsole" >
// <property name="exam" ref="exam" />
</bean>
하지만 아래처럼 똑같은 bean이 2개가 존재한다면? 모호함이 생겨 오류가 발생한다.
<bean class="spring.di.entity.NewlecExam" p:kor="10" p:eng="10" p:com="10" p:math="10"/>
<bean class="spring.di.entity.NewlecExam" p:kor="20" p:eng="20" p:com="20" p:math="20"/>
그럴땐 `id="exam"`를 추가해주면 setter 메서드에서 이름과 매칭되는 id의 bean을 사용한다.
// 하나의 bean만 id="exam" 추가, setter 메서드의 매개변수 이름을 보고 매핑
<bean id="exam" class="spring.di.entity.NewlecExam" p:kor="10" p:eng="10" p:com="10" p:math="10"/>
<bean class="spring.di.entity.NewlecExam" p:kor="20" p:eng="20" p:com="20" p:math="20"/>
즉, 다시 정리하면 서로 다른 bean 일 때는 모호함이 없어 id를 사용하지 않아도 되지만 같은 bean 객체를 2개 이상 생성할 때는 모호함이 생겨 id를 설정해 줘야 한다.
<bean id="exam1" class="spring.di.entity.NewlecExam" p:kor="10" p:eng="10" p:com="10" p:math="10"/>
<bean id="exam2" class="spring.di.entity.NewlecExam" p:kor="20" p:eng="20" p:com="20" p:math="20"/>
그럴때는 setter 메서드 위에 `@Qualifier`를 추가하여 사용할 bean의 id를 인수로 적어주면 된다.
@Autowired
@Qualifier("exam2") // 추가, @Qualifier("exam1") or @Qualifier("exam2")
@Override
public void setExam(Exam exam) {
    this.exam = exam;
}
즉, 정리하면 @Autowired : 타입으로 매핑, @Qualifier : id로 매핑
또한 @Autowired의 위치는 3가지가 존재한다.
- 필드 위에(기본 생성자를 호출하면서 주입됌, 기본 생성자 필수로 존재해야함)
- 오버로드 생성자 위에(생성자 DI로 주입시킬 때)
- setter 메서드 위에(setter DI로 주입시킬 때)
2번 오버로드 생성자 같은 경우는 exam을 2개 이상 넣을 수 있다고 생각해서 아래의 코드에서 오류가 발생한다.
@Autowired
@Qualifier("exam2") // 오류
public InlineExamConsole(Exam exam) {
    System.out.println("overloaded constructor");
    this.exam = exam;
}
이럴때는 아래의 코드처럼 매개변수에 지정할 수 있다.
@Autowired
public InlineExamConsole(@Qualifier("exam2")Exam exam) {
    System.out.println("overloaded constructor");
    this.exam = exam;
}세가지 방법중 강사님은 필드위의 위치를 추천하신다.
추가로 bean이 없어도 로직이 실행되도록 하는 옵션은 `@Autowired(required = false)`이다.
참고자료
[1] 유튜브 채널 뉴렉처 - 스프링 프레임워크 강의 14강 - @Autowired의 위치와 required 옵션
'🖥️ Backend > Spring' 카테고리의 다른 글
| [Spring] 14.@Configuration (0) | 2024.12.30 |
|---|---|
| [Spring] 13.@Component (0) | 2024.12.30 |
| [Spring] 11.Collection DI (0) | 2024.12.27 |
| [Spring] 10.Constructor DI(value타입) (0) | 2024.12.27 |
| [Spring] 9.Setter DI(value타입) (1) | 2024.11.08 |