
@Component
@Component란 개발자가 직접 작성한 Class를 Bean으로 등록하기 위한 Annotation이다.
위에서 설명한 스프링의 컴포넌트 스캔 (@ComponentScan) 기능에 의해 스캔될 때, 주어진 패키지 내에서 @Component 어노테이션이 적용된 클래스를 식별하고, 그러한 클래스의 빈을 생성하여 ApplicationContext에 등록한다.
이제 아래의 xml에서 객체를 생성하는 부분까지 @Component로 변경해보자
<bean id="console" class="spring.di.ui.InlineExamConsole" > // @Component로 대체 예정
    // <property name="exam" ref="exam" /> // 이전 시간에 @Autowired로 대체
</bean>
우선 xml파일에 <context:component-scan base-package="spring.di.ui"/>를 추가해준다.
<context:component-scan base-package="spring.di.ui"/>
//spring.di.ui패키지 안에 @Component를 스캔해라

//<context:component-scan base-package="spring.di.ui, spring.di.entity"/>
//@Component로 생성할 객체가 여러개면 base-package에 쉼표로 해당 패키지 경로 추가
<context:component-scan base-package="spring.di.ui"/>가 <context:annotation-config/>역할까지 하기 때문에 이전에 추가하였던 <context:annotation-config/>는 삭제해도된다.
그리고 InlineExamConsole 클래스 위에 @Component를 추가해준다. getBean 메서드를 `참조형`으로 객체를 찾을때는 @Component만 사용하면된다.
@Component
public class InlineExamConsole implements ExamConsole {
	//.....
}

public class Program {
	public static void main(String[] args) {

    ApplicationContext context = new ClassPathXmlApplicationContext("spring/di/setting.xml");
    ExamConsole console = context.getBean(ExamConsole.class);
	console.print();
    }
}
getBean 메서드를 `이름`을 통해서 객체를 찾을때는 @Component("console")로 이름을 지정해줄 수 있다.
@Component("console") // 변경
public class InlineExamConsole implements ExamConsole {
	//.....
}

public class Program {
	public static void main(String[] args) {

    ApplicationContext context = new ClassPathXmlApplicationContext("spring/di/setting.xml");
    ExamConsole console = (ExamConsole) context.getBean("console"); // 변경, @component("console")의 console
	console.print();
    }
}
@Value
그렇다면 @Component로 객체를 생성할 때 값들의 초기화는 어떻게 할까?
아래처럼 @Value 어노테이션을 사용하면된다.
@Component
public class NewlecExam implements Exam {

	@Value("20")
	private int kor;
	@Value("30")
	private int eng;
	private int math;
	private int com;

	/* ..... */
}
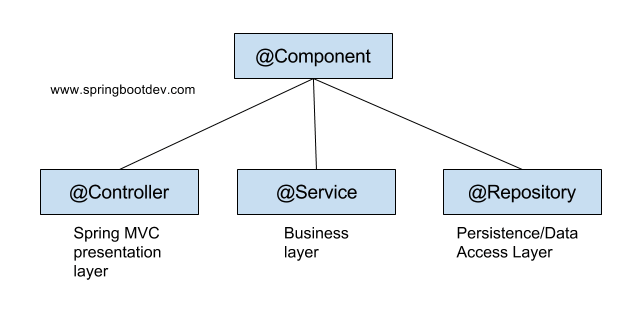
@Controller @Service @Repository
또한 @Controller, @Service, @Repository 어노테이션들은 MVC 구조를 바탕으로 @Component의 구체화된 형태이다. 어노테이션을 세분화 함으로써 가독성 측면에서 해당 각각의 어노테이션을 가진 클래스의 역할을 알 수 있게된다.
@Bean
또한 @Component 말고도 스프링 컨테이너에 객체를 빈으로 등록할 수 있는 @Bean가 존재한다.
@Bean 어노테이션은 개발자가 직접 제어가 불가능한 외부 라이브러리 등을 Bean으로 만들려고 할 때 사용된다.
@Bean은 메소드 레벨에서 선언하며, 반환되는 객체(인스턴스)를 개발자가 수동으로 빈으로 등록하는 애노테이션이고 반면 @Component는 클래스 레벨에서 선언함으로써 스프링이 런타임시에 컴포넌트스캔을 하여 자동으로 빈을 찾고 등록하는 애노테이션이다.
//@Component 사용 예제
@Component
public class Utility {
   // ...
}
//@Bean 사용 예제

@Configuration
public class AppConfig {
   @Bean
   public MemberService memberService() {
      return new MemberServiceImpl();
   }
}
| @Bean | @Component |
| 메서드에 사용 | 클래스에 사용 |
| 개발자가 컨트롤이 불가능한 외부 라이브러리 사용시 사용 | 개발자가 직접 컨트롤이 가능한 클래스에 사용 |
참고자료
[1] 유튜브 채널 뉴렉처 - 특화된 @Component 어노테이션 (@Controller/@Service/@Repository)
'🖥️ Backend > Spring' 카테고리의 다른 글
| [Spring] 15.순수 Java AOP (0) | 2024.12.31 |
|---|---|
| [Spring] 14.@Configuration (0) | 2024.12.30 |
| [Spring] 12.@Autowired (0) | 2024.12.30 |
| [Spring] 11.Collection DI (0) | 2024.12.27 |
| [Spring] 10.Constructor DI(value타입) (0) | 2024.12.27 |